Migrate a GCM Client App for Android to Firebase Cloud Messaging
Set Up a Firebase Cloud Messaging Client App on Android
Firebase Quickstart Samples for Android
Google 推出 FCM 後,一直鼓勵開發者自 GCM 移轉至 FCM,也致力簡化步驟,減少開發者在移植過程中所花費的功夫與時間。
登入 Firebase Console(主控台)
點擊 "匯入 GOOGLE 專案"
點選您要匯入 FCM 的 GCM 專案
→ "新增 FIREBASE" 鈕
點選 "將 Firebase 加入您的 Android 應用程式"
輸入您的 app 的完整的 package 名
→ 註冊應用程式
FCM 主控台會自動為您產生一個 google-services.json 檔,將它下載並存放於您的 app 專案的目錄下
修改 build.gradle
專案層級的 build.gradle
buildscript {

    ...
    ...

    dependencies {
        classpath 'com.android.tools.build:gradle:2.3.3'
        classpath 'com.google.gms:google-services:3.0.0'
    }
}

...
...
應用程式階層 build.gradle
...
...

dependencies {
    ...
    ...

    implementation 'com.google.firebase:firebase-core:10.2.1'
    implementation 'com.google.firebase:firebase-messaging:10.2.1'

}
// 寫在最末列
apply plugin: 'com.google.gms.google-services'
修改 AndroidMainfest.xml,移除之前與 GCM 有關的所有設定,因為這些工作,FCM
都包辦了。
<!-- 移除(或註解) 下述設定 -->
    <!-- <permission
        android:name="com.example.permission.C2D_MESSAGE"
        android:protectionLevel="signature" />
    <uses-permission android:name="com.example.permission.C2D_MESSAGE" />
    -->
    <!-- App receives GCM messages. -->
    <!--
        <uses-permission android:name="com.google.android.c2dm.permission.RECEIVE" />
    -->

    <uses-permission android:name="android.permission.INTERNET" />
    <uses-permission android:name="android.permission.ACCESS_NETWORK_STATE" />

...
...

<application
        ...
        ... >

    <!-- 收到通知時, 到狀態列要顯示的 icon -->
    <meta-data
        android:name="com.google.firebase.messaging.default_notification_icon"
        android:resource="@drawable/ic_oracle" />
    <!-- 收到通知的背景色 -->
    <meta-data
        android:name="com.google.firebase.messaging.default_notification_color"
        android:resource="@color/black" />

...
...

<!-- 移除(或註解) 下述設定 -->
<!-- 接收 GCM 的 receiver -->
        <!--
        <receiver
            android:name="com.google.android.gcm.GCMBroadcastReceiver"
            android:permission="com.google.android.c2dm.permission.SEND" >
            <intent-filter>
                <action android:name="com.google.android.c2dm.intent.RECEIVE" />
                <action android:name="com.google.android.c2dm.intent.REGISTRATION" />

                <category android:name="com.example" />
            </intent-filter>
        </receiver>
        -->
<!-- GCM service -->
<!--
<service android:name="com.example.GCMIntentService" />
-->
原本的 GCMIntentService、ServerUtilities.java (參考 【Android】使用 GCM(Google Cloud Messaging) 這篇筆記)都可以移除,不需要了。
在實體機第一次執行 APP 後,關閉 APP,版本為 Oreo(8.0)(含) 以上的實體機,還要在 "自啟動管理" 開啟 APP 的自啟動選項,才能收到通知。
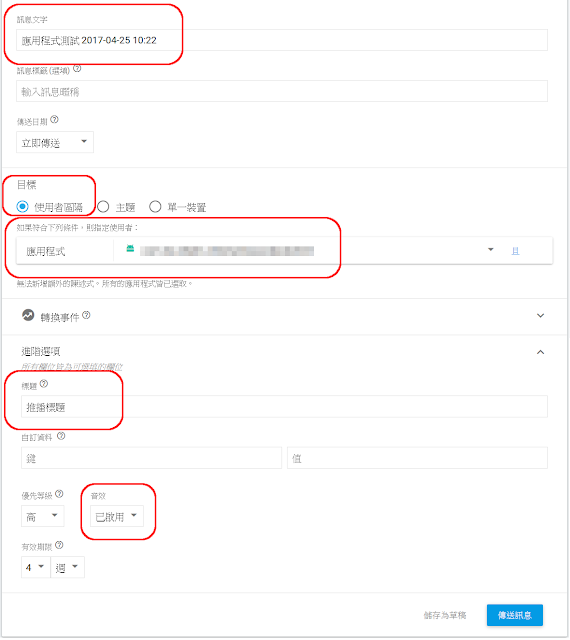
再回到 FCM console
→ Notification
→ 新增訊息
輸入要推播的訊息內容
過一會兒後,裝置就會收到通知了。
點擊已發送的記錄,還可以看到發送統計。
相關筆記 ----
【Android】使用 GCM(Google Cloud Messaging)
【Android Studio】GCM client 端設定 - 速成篇


